


Choosing the Right Punching Bag for Your Space
The selection of appropriate training equipment needs a proper understanding of various home gym punching bag types for effective space development. The distinct types of punching bags exist to fulfill individual training requirements. These bags permit light and moderate cardiovascular activities and fitness training exercises. The heavier weight and durable materials feature in home gym punching bags make them suitable platforms for boxers and martial artists who want to build their technique and strengthen their capability. The traditional hanging punching bag provides top-quality training with enhanced movement ability to conduct footwork drills, which pro gyms consistently prefer.
Selecting the best punching bag at home requires evaluating the area where it must be installed. You should choose freestanding bags whenever you do not have proper installation points. You will gain more from your training with a hanging punching bag workout when your gym has a suitable spot to mount it on the ceiling or beams. Want to take your punching bag routine to the next level? Don’t miss The Complete Guide to Punch Bag Training: Cardio Fitness, Weight Loss, and Full-Body Fitness for expert tips on cardio, weight loss, and total-body fitness.
The proper bag selection for training demands consultation of a punching bag size chart. Beginners alongside those who want speed should select 40- to 60-pound bags, but those doing power exercises need 80-pound or 100-pound and heavier models. Choosing the correct bag size enables you to reach your fitness targets through workouts conducted safely.
How to Choose Between a Freestanding Punching Bag and a Hanging Punching Bag?

Your training punching bag selection depends on three determining elements that include available workout space, desired exercise objectives, and your preferred installation method. The two main types of available punching bags are upright standing units and hanging apparatuses, which offer distinct benefits suitable for buyers.
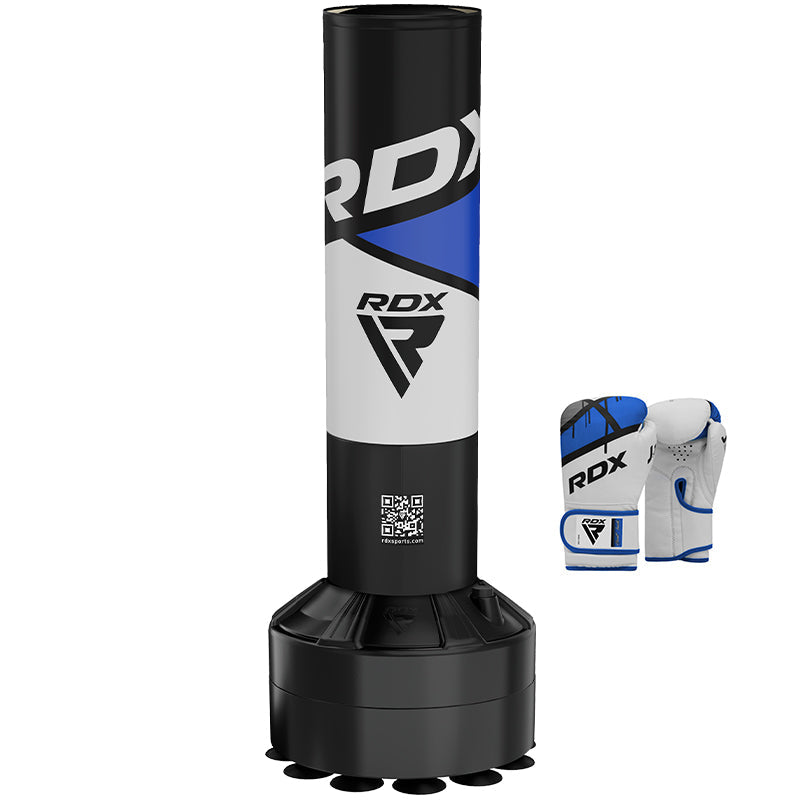
A suspended best punching bag at home helps people who need flexible ceiling accommodations and swift implementation. The setup process for this bag requires no holes or ceiling attachments, and you can also place it on the floor and stabilize it by filling the base with water or sand before beginning your exercises. You can choose different areas for training because this equipment is easily portable. Those who need a permanent punching bag should go for the RDX Freestanding Punching Bag as their solid option. The product features an easy design supported by a firm base structure and durable materials that handle regular domestic and gym workouts.


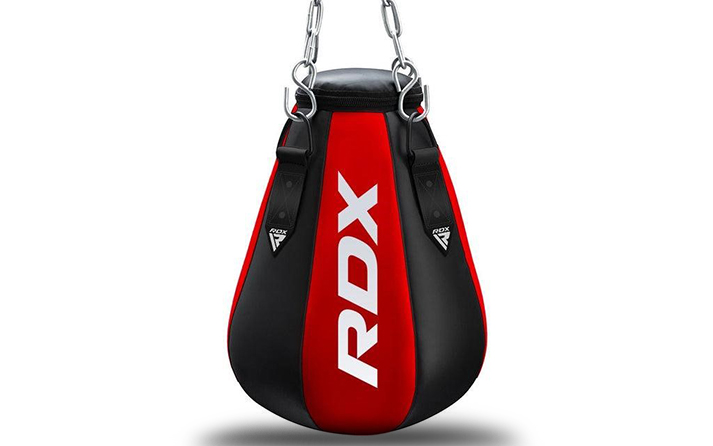
Changing from a hanging punching bag to a wall-hung version is suitable for experienced fighters training in advanced methods. Such bags require ample space together with a robust ceiling structure or stable stand to keep their weight in place. Three significant advantages come from using hanging punching bags, which include improved range of motion and ability to turn while training footwork. Customers who choose the RDX Punching Bag with Chains and benefit from its exceptional performance features. The product features durable construction and specialized safety chains intended for user-adjustable installation operations. The bag functions perfectly when hung from a ceiling hook system or a wall-mounted bracket due to its ability to perform powerfully and well.
When comparing the two, there are some clear pros and cons. Freestanding bags are easy to place and move, making them great for home use or shared areas. However, they might not keep as stable throughout hard workouts. Hanging bags offer a more true training feeling and significant movement, but they demand more area and setup work.


Preparing the Space for Punching Bag Installation

To achieve proper safety during your workout sessions, you need the correct location and necessary equipment when setting up your punching bag, whether at home or at a gym facility. We need to discuss where the perfect location for the punching bag should be. A proper area must be cleaned to create a training spot without restrictions. Reflect on your movement while you make enough floor space around the bag to prevent interruptions for physical agility and stability. When using a hanging punching bag, you must examine ceiling height to ensure proper swinging and avoid impact with any objects.
The tools you need for your setup determine what equipment you must get. Hanging bag installations demand heavy-duty hooks that should be strong enough to support heavy loads. Either ceiling mounts or wall brackets provide suitable solutions when deciding where to place your bag. Be sure to put these on tightly to avoid mistakes. If you don’t want to drill into the roof or wall, you might go for a punching bag stand.
Safety should always be a concern. Ensure the room is free of sharp or hard objects that could cause harm. Wear protected clothes like gloves and wraps throughout training, and double-check the security of your hitting bag before every workout.
With the proper planning and setting, your punching bag area will become an ideal training zone.
Step-by-Step Guide to Installing an RDX Punching Bag

Step 1: Choose the right spot:
Training effectiveness for a punching bag depends on finding the appropriate location between home and gym storage areas. Check that the room contains no obstacles before starting. The space in front of and behind the bags should be free of obstruction so you can move safely through the area. The room’s safety and capability to move freely remain important when doing intense workouts.
Hanging punching bags require specific attention to ceiling height before installation. The bag needs to be hung at an optimal height, with its central point positioned approximately at chest level. The proper room above and next to the bag is needed to permit an unrestricted swinging motion while avoiding contact with walls or the ceiling.
Pick a spot with a flat and even surface for people using a solo punching bag. This helps keep the bag straight when you’re hitting and kicking. An uneven surface could cause the bag to wobble or tip over, which could be dangerous during your workout. Ensuring a level surface is key to stability and safety when setting up your MMA Training Punching Bags. You can create a safer and more effective training environment by picking the proper place. Whether you’re looking for a hung bag or a single one, the room and surface matter a lot for a smooth workout.
Step 2: Installing a hanging punching bag:
Installing a punching bag at home or in the gym is easy if you follow the right rules. First, mark the spot where you plan to put the mount. Make sure it’s in a strong part of the ceiling or wall. If you’re using a roof mount, it’s better to utilize a stud finder to discover a strong beam. This will help keep the bag covered and safe throughout workouts.
Once you’ve marked the right spot, drill holes for the fixing components; use a drill that fits the size of the screws you’re using. Be careful and double-check the spot before you drill. After that, fix the hanging hooks tightly to the ceiling or wall using strong bolts.
Next, connect the punching bag to the base using heavy-duty ties. Ensure the chains are even so the bag doesn’t lean to one side. Give it a couple of light swings to check your balance before you start exercising. Looking for a complete training setup? The KARA Training Punching Bag Set features the durable RDX MMA Punch Bag made with Maya Hide NTearx Skin, reinforced stitching, and LoopX Straps for easy hanging and lasting performance—perfect for all levels of training.
Step 3: Setting up a freestanding punching bag:
Setting up a solo hitting bag is easy and doesn’t take much work. First, unbox and connect the base and the bag. Most separate punching bags come in two main parts—the base and the hitting bag itself. Follow the rules in the directions to join them properly. Make sure everything is correctly linked.
Next, you’ll need to fill the base with sand or water. This is important as the weight helps keep the hitting bag steady during your workout. Sand is usually the ideal solution because it’s heavier and gives extra stability. However, water is more handy if you plan to move the bag later. Once the base is complete, it’s time to test the strength. Gently slap the bag a couple of times to notice how it acts. The bag should stay straight and not shift around too much. Add more weight to the base if it wobbles or looks like it might fall.
This method is excellent for people who don’t want to drill holes or build ceiling mounts. A standalone punching bag gives you freedom, and with a strong base, it’s safe and sound for all levels of training.
Related Article: How to Choose the Right Punching Bag for Your Training Needs
Tips for Maintaining Your RDX Punching Bag
The survival of your punching bag depends on excellent care for long-term safety as a training tool. The phases described below can help you maintain your luggage while preserving its top condition.
The first important step involves regular cleaning operations. If you’re wondering how to clean punch bag surfaces properly, each workout should end with wiping down the bag using a fresh, wet cloth. The cleaning operation eliminates accumulated sweat, dust, and filth, which otherwise would accumulate over time. Failure to wipe off sweat from your bag allows the material to deteriorate and develop unpleasant odors. For a better clean, add a little soap solution every once in a while.
Next, check for wear and tear. A thorough inspection of the bag must be conducted to identify potential damage that presents itself on stitching, as well as around chains and straps. You should fix any tears that you find on the bag right away because delays will allow bigger problems to develop. Chains should be safe and rust-free to prevent crashes.
If you’re focused on MMA-style workouts, read the RDX MMA Punch Bag Training Tips and Buying Guide for expert advice on gear and training techniques. It boosts heart health, builds muscle strength, and helps you let go of fear. You’ll feel more confident and eager after each practice.
Best Workouts with Your Punching Bag
Punching bag training serves as an entertaining workout and effective exercise for remaining fit while providing helpful benefits for maintaining wellness. The practice of using a punching bag offers benefits for your physical strength development as well as health improvement and stress management. The following description shows you a simple approach to learning basic punching bag training methods.
Before training, start with a proper body warm-up routine. The preparation of warming up serves two important purposes: reducing failures and making muscles ready for movement. A few minutes of jump rope exercise will raise your heart rate effectively. Shadowboxing allows you to move and throw air punches to make your shoulders and arm muscles relax.
Related Article: Types Of Workout One Can Do With a Punching Bag
Troubleshooting Common Punching Bag Setup Issues
If you’re having problems with your punching bag, here are a few simple fixes to ensure your workout goes smoothly.
Issue 1: Punching bag moving too much
If your punching bag sways too much when you’re training, it could be due to the chain or hanging gear not being stable enough. To fix this, try changing the length of the chain to make it tighter or use heavier-duty links. You can also judge if the hook or closing point is strong enough. Adding more support or altering the tension could reduce the swinging.
Issue 2: Uneven surface produces instability
An uneven surface can make single punching bags shaky and prone to falling over. To fix this, make sure the place you’re putting the bag on is smooth and level. If it’s not, you could try shifting the bag to a different area or using leveling tools to fix the surface to reduce shaking.
Issue 3: Unstable punching bag stand
If your punching bag stand feels wobbly, ensure that it’s joined tightly and all parts are fixed effectively. Double-check the stand’s base for weight spread and add more weight if necessary to improve its stiffness.
Related Article: How to Hang a Punching Bag
Conclusion
Setting up your punching bag properly is important for both safety and efficiency. A well made bag suggests that you can train successfully without the risk of damage. It also helps you improve your workout results, whether focused on strength, cardio, or stress reduction. Proper fitting ensures the bag stays safe and steady, removing any extra movement that could hamper your training.
If you want to gain the best results from your workouts, starting with the right gear is important. By getting an RDX punching bag and setting it up according to the ideal method, you are giving yourself the best chance for a fantastic training trip. Whether you’re setting it up at home or in a gym, proper fitting makes a big difference in your safety and the bag’s life.
Now is the best moment to start your exercise journey with an RDX punching bag. With strong construction and high-quality design, you’ll get a punching bag that stands up to hard training. Ready to get started? Visit our website to get your RDX punching bag and watch our full line of exercise tools to improve your exercises.


